Decision 3 is the 4th game of the Decision series that was released on November 14, 2014.
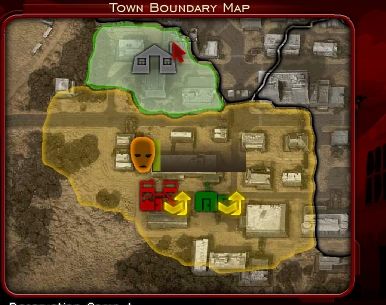
Decision 3 :Town Boundary Map
Storyline[]
Following their success in Decision 2 the survivor pushes on into yet another infested city.
The City[]
- Border area
- Coldwater area
- Massacre
- Westside area
- Commonwealth area
- Grayditch area
- Den
- Broken Hills area
- Freeside area
- Reservation Camps A, B and C
Enemies[]
The city has been overrun by zombies in the south west and a powerful mutant faction in the north east.
Zombies[]
- Zombie Roamer
- Zombie Reaver
- Feral Zombie
- Burning Ghoul
- Marked Ghoul
- Zombie Dog
- Zombie Warg
- Zombie Troll
- Giant Zombie Troll
- Zombie God Troll (Found at the bottom of Massacre)
Mutants[]
- Mutant Peon
- Mutant Warrior
- Mutant Brute
- Mutant Master
- Mutant Captain
- Wolf Mutant
- Wulver Mutant
- Super Mutant
- Super Mutant Overlord
- Super Mutant Boss (Find in the bottom of the right of Den and in the Freeside area)
Weapons[]
| Class/Name | Max damage | + max exp | Best reload | Clip | Distance | Reward | Notes |
|---|---|---|---|---|---|---|---|
| 01P1 / Colt Python | 100% | Fires rage | |||||
| 01P2 / Beretta Cheetah | 56 | 2 | 10 | 600 | 100% | Fires rage | |
| 01P3 / Desert Eagle | 100 | 140 | 2 | 15 | 800 | 100% | Fires rage |
| 02S1 / Coach Gun | 60 | 300 | 70% | ||||
| 02S2 / Winchester | 120 | 350 | 70% | ||||
| 02S3 / Remington | 200 | 400 | 70% | ||||
| 03A1 / MP5 | 70% | ||||||
| 03A2 / AK74 | 70% | ||||||
| 03A3 / M60 | 70 | 3 | 40 | 700 | 70% | ||
| 04SR1 / Enfield | 70% | ||||||
| 04SR2 / Dragunov | 70% | ||||||
| 04SR3 / Barrett | 210 | 260 | 1700 | 70% | |||
| 05MG1 / Browning | 60% | ||||||
| 05MG2 / Slostin | 60% | ||||||
| 05MG3 / Minigun | 70 | 5 | 40 | 600 | 60% | ||
| 06RL1 / Bazooka | 84 | 4 | 1 | 70% | - Move | ||
| 06RL2 / RPG | 123 | 4 | 1 | 70% | - Move | ||
| 06RL3 / Stinger | 185 | 4 | 1 | 70% | - Move | ||
| 07G1 / Mills Bomb | 1 | 30% | |||||
| 07G2 / F1 Grenade | 1 | 30% | |||||
| 07G3 / Z Grenade | 130 | 3 | 1 | 30% | |||
| 08Mi / Panzermine | 250 | 320 | 1.5 | 1 | 70% | ||
| 09F1 / ROKS Flamethrower | |||||||
| 09F2 / Flammenwerfer | 56 | 5 | 70% | - Move | |||
| 09F3 / M2 Flamethrower | 100 | 3 | |||||
| 10Me1 / Combat Knife | 0 | 0 | 0 | 300% | |||
| 10Me2 / Crowbar | 0 | 0 | 0 | 300% | |||
| 10Me3 / Machete | 250 | 280 | 0 | 0 | 0 | 300% | |
| 11S / Ballistic Shield | 120 | 160 | 800 | 80% | Fires rage
+ Armor | ||
| 12B / Phantom Bow | 130 | 1 | 1500 | 70% |
Teammates[]
Soldier[]
Soldiers are required for most Outpost and Shelter upgrades. They can also be recruited for missions with the "Commander" ability for 100 Money. Not to confused with their non-interactable "Military" variant.
Captain[]
Captains are required for some Outpost and Factory upgrades. They can also be recruited for missions with the "Commander" ability for 150 Money.
Ranger[]
Rangers are required for Outpost upgrades and each one in the team creates 5 Materials per day. They can also be recruited for missions with the "Commander" ability for 100 Money.
Engineer[]
Engineers are required for Outpost and Factory upgrades and each one in the team earns 150 Money per day.
Builder[]
Builders are required for Outpost and Factory upgrades upgrades and each one in the team creates 5 Materials per day.
Citizen[]

Citizens are required for Shelter upgrades and each one in the team earns 100 Money per day.
Inspectors[]
Decision 3 also introduces Inspectors, a group of NPCs who can be found throughout the city and once guided to shelter unlock more weapons, armour and abilities.
- Armord - Border Area
- Jonson - Coldwater Area
- Mark - Westside Area
- Rob - Commonwealth Area
- Rock - Broken Hills Area
- Porterfield - Freeside Area (Can't be found on Easy difficulty)
Armor[]
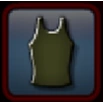
Underwear[]
- Armor: 25% (5% + 20% exp)
- Speed: +5%
In-game description: "Typical army jersey made of cotton. Provides no protection against damage. Does not hinder movements so you can run in it only where there is a lack of threat."
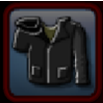
Leather Jacket[]
- Starting armor:
- Max armor: 45% (25% + 20% exp)
- Speed: -10%
In-game description: "Lightweight body armor composed of ceramic plates. Mainly protects human torso. Reduces damage and has a negligible effect on the ability to move."
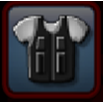
Combat Armor[]
- Starting armor: 15%
- Max armor: 60% (40% + 20% exp)
- Speed: -20%
In-game description: "Medium leather armor with stitched metal plates. Protects the entire upper part of the body. The best ratio between the protection from damage and mobility. Reduces damage and reduces speed of movement."

Kevlar Armor[]
- Starting armor: 20%
- Max armor: 80% (60% + 20% exp)
- Speed: -30%
In-game description: "Heavy armor made from balistic fabric and titanium plates. Protects the entire human body from any kind of damage to the maximum. Because of the heavy weight most often used only for defensive purposes. Significantly reduces damage however, greatly reduces the movement speed."
Skills[]
All skills max out at level 3, except for Rage Injection and Taunt.
- Stamina - Increases maximum health and regeneration rate.
- Max Health: 250, Regeneration: 6 per second.
- Max Health: 300, Regeneration: 12 per second.
- Max Health: 370, Regeneration: 16 per second.
- Engineering - In game description: "Engineering allows improvement of Outposts, Factories and Shelters to a higher level."
- ?
- ?
- Required for: Third Outpost Armament upgrade Workshops III, the Factory upgrade.
- Hacker - Allows you to "hack" into ATMs, which gets you cash. You can only hack into ATMs that are at or below your hacking level. Along with that, you can hack into Storehouses, which are harder to find.
- Access to Level 1 ATMs and Storehouses.
- Access to Level 2 ATMs and Storehouses.
- Access to Level 3 ATMs and Storehouses.
- Detector - Gives an in-game map that can be accessed anytime, and upgrades allow you to see more things, such as enemies, allies, and stashes. Tap the keyboard key "Z" to activate (and deactivate) the detector (if unlocked). Hold "Z" to access the map.
- Detects Enemies (Red/Red with skull) and Useful places (Yellow).
- Detects Enemies (Red/Red with skull), Useful places (Yellow), Allies (Green) and Loot (Pink).
- Detects Enemies (Red/Red with skull), Useful places (Yellow), Allies (Green), Loot (Pink) and Stashes (Blue).
- Commander - Lets you have companions that follow you around and kill zombies. Upgrade to increase max team size.
- Space for 1 companions
- Space for 3 companions
- Space for 6 companions.
- Agility - Improves default walking speed and lets you sprint if you hold the "Shift" key on your keyboard, which doesn't allow you to fire, but increases speed drastically. Upgrading this will further increase your walking speed, sprinting speed, and duration of the sprint.
- Default speed: 110%, Sprint speed: 140%
- Default speed: 130%, Sprint speed: 210%
- Default speed: 150%, Sprint speed: 230%
- Stability - Holding the Spacebar down will activate Stability. You cannot move, but knockback resistance and armor are increased. Upgrades increase the amount of knockback resistance and armor. Additionally, level 3 Stability decreases cooldown of ALL skills by 50%.
- While Active Armor: +10%, Knockback resistance: +30%
- While Active Armor: +20%, Knockback resistance: +50%
- While Active Armor: +30%, Knockback resistance: +60%, Cooldown of all abilities: -50%
- Self-Defense - Allows you to automatically melee attack enemies which are close to you. Upgrades will further increase damage dealt by this attack, and give it a damage range instead of a set number. (Example; 20-40)
- Damage: 15
- Damage range: 20 to 30
- Damage range: 30 to 50
- Supplier - Increases your teammates damage and health. Upgrade to further increase damage and health.
- ?
- ?
- Health: +30%, Damage: +45
- Berserk - This skill has multiple levels that add on to each other.
- Adds a Berserk meter above your normal health bar, that is filled by getting damaged by enemy attacks, or killing enemies. If filled up, you gain 20% health and 30% attack rate, and faster reload speed. The period that this is active can be extended by getting hurt or killing whilst you're berserk. This is called being "Enraged."
- Pressing the "V" key automatically triggers Rage with a 20 second cooldown.
- Adds a chance to become Enraged when you are about to die, knocking down all enemies nearby, and remaining alive.
- Rage Injection - A very useful skill that can make an enemy attack everyone else around them, including their allies. This skill only has one level. Press the keyboard key "X" to activate. You must be holding a pistol to load the injection in the gun, and you must then hit the enemy you wish to enrage. Some enemies are immune, such as the Giant Zombie Troll, the Zombie God Troll, the Super Mutant Overlord, and the Super Mutant Boss.
- Taunt - Pressing "C" draws in surrounding enemies and forces them to attack you.
- Quake Leap - Pressing "F" makes you leap towards the enemy and deal damage to any you land on.
- Damage: 40, Cooldown: 10 seconds
- Damage: 70, Cooldown: 8 seconds
- Damage: 100, Cooldown: 6 seconds
- Collar
- 20% (+exp) chance of success
- 40% (+exp) chance of success
- 60% (+exp) chance of success .
- Elite Team - Equips teammates with new weapons and armor.
- ?
- ?
- Soldier gets: Ballistic Sheild, Captain gets: Bazooka, Ranger gets: Minigun